Thursday, May 30, 2013

End of the week drawings.. Cortina Pursuit Special

Pursuit Special


After a few years of chasing fuel and eating Dinky-Di would you be bothered about paint finish..

Try to avoid low flying saucepans.. and don't blaspheme  
One of my favorite must see films is Mad Max and of course Mad Max II The Road warrior with it's superb opening scene: Enjoy


Oh and there is no way I'd survive more than five minutes on those roads with my 1300 Cortina, I'd be better off pulling over and politely offering to syphon my fuel into jerry cans for them, perhaps that would avoid a crucifixion by the "mighty humungous" while catching half a dozen arrows (or worse!!) in the arse... 

Thursday, May 23, 2013

New artwork Total Recall style.


Detail


Another week has nearly sailed by and I managed to knock out a new artwork one evening after watching Total Recall. I liked the sets the cars and Kate Bekinsale.  There was a three breasted lady and Kate Bekinsale, there was NO eyes bugging out scene like the original... but, did I mention there was Kate Beckinsale.

So, I thought I'd have a go at painting a futuristic Total Recall style Cortina..  I'm not entirely sure if it is progress to suggest Cortinas would be around in the distant future however if you are living in a dystopian nightmare, oppressed by manipulative government agencies and stuck in a dead end job then surely driving home in a Cortina would really make up for it all...


Saturday, May 11, 2013

Old Car Stereo MP3 AUX Conversion

OOOww it's that time of the year when car boot sale bargains can be had and I can start filling the house with other peoples unwanted shite.. ahem, I mean priceless 'treasure'.

Last weeks bargain was this old in-car cassette player, boxed 'un all for £3!! It'd be a crime not to buy it for that price.  

It still has it's warranty card.  Where are Minachi now I wonder?

I do love a bargain! It was manufactured by a company called Minachi in Japan in around 1972 - the same year as my car.  It's pretty basic, there is no auto reverse or rewind on it but the power light is purple, psychedelic man!

Lashings of chrome

The main reason I went for a tape player over an old radio is most cassettes were pre-recorded in stereo so most players have stereo sound which is good for what I have in store for it, namely an iPod conversion.

The first task was to take the thing to bits, taking things to bits was a pass-time of mine as a kid, torches were a personal favorite for some reason and it is still a running joke now with my dad, if his torch 'mysteriously' stops working I get the blame.

I located the playing head and traced the wires back to the circuit board. There are only three, left channel, right channel and earth.

Located the playing head


Next job was to attach wiring for a 3.5mm headphone socket.

Solder on the connections.
I'm not the best solderer but it's fairly neat.  I used some fairly hefty wire to reduce signal loss but I doubt it makes much difference on a player like this. The last step was to drill the metal casing to make a hole for the AUX jack. 

Finding a convenient place to mount the jack
Finding a convenient spot was fairly straightforward.  I did not want to see the jack so it's on the back and I'll run a headphone extension lead with a panel mounted AUX jack else where, maybe hidden in the glove box or center console. 
Now of course it would be far easier to use one of those tapes that has a headphone jack on the end of a lead attached to connect up my iPod but where is the fun in buying a readymade solution!

I tried it out and it works OK but you need to insert a cassette in the player for it to operate as there is no on/off switch.  I cant remember the last time I used a cassette, so could I find a one in my house? balls... I had to ask a mate and lend one just so I could try it out.  Years ago I had dozens.

I don't fancy using cassettes every time I want to plug in the ipod and then I might as well have just bought a plug in adaptor and be done with messing around. I do not tend to give up that easily though.  Whenever you bung a cassette in it switches on, there must be a switch somewhere.
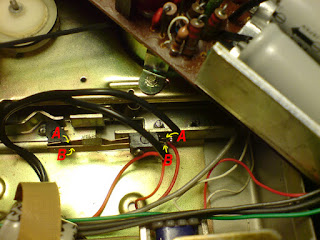
Found it!
When the tape gets pushed in the mechanism slides backwards and pushes two contacts together mounted to the frame of the tape deck which is a nice straight forward design. 
I found some appropriate gauge wire (from a disused transformer) and proceeded to strip that back and use it for an externally mounted on/off switch. 
I drilled another hole in the case for the wire to exit which I knotted, so it cant be accidently pulled out, then de-burred and taped the hole up, so there are no sharp edges, finishing with sealant.   I also tidied some of the wiring inside the unit as the solder was getting ropey after 40 years. Hopefully now the circuit can be made without the need to insert a tape!  

Nearly there 
You can now see the two parts of loom in place.


Going back together nicely
I whiled away a few hours on this but as you put it together the evidence of the time spent working on it is hidden away. 
Rear of unit
There we have it, a new AUX socket which will accept an iPod or other MP3 player and a remote on and off fly lead to avoid having to insert a tape.  I think I'll probably mount an AUX connection in the center console and have a power switch next to it which will activate the port or maybe you can get some kind of headphone jack that works like a switch when you plug in combining the two?  

Anyway from a casual glance you'd not even know about the mod. The bonus is that it still plays tapes and when you plug an iPod into the AUX port it senses that and cuts out the sound from the tape even though it continues to run.  Really pleased, the radio was £3, the 3.5mm stereo jack was about £1.30 and the wire was all knocking about in drawers for free so I got an authentic 1970's stereo which plays MP3 (in stereo!!) for under a fiver!


Thanks for reading!

Friday, May 10, 2013

Fixing Cortina Mk3 wiper motor self park function.


I guess at some point you may have had the odd electrical issue with the Mk3 Cortina and if you're like me you might have found that your windscreen wipers don't park anymore.  Well I was getting fed up timing switching off of my wipers just so they sat flat against the bottom of the windscreen and decided to see what the problem was.


If you have wipers which work but do not park any longer then I will explain how I resolved the issue, now this is important!! - I am not a mechanic, you can probably tell from some photos so if you follow my advice and, for want of a better expression, 'bollocks your car up or injure yourself' you only have yourself to blame. Take responsibility for your own actions and safety and seek assistance from someone qualified if you are not confident. Now that has been said lets get on with it:

First thing to check before you go pulling bits of Cortina off is check the wiring.  If you have the additional wiper control pedal on the floor which gives you a wipe function without using the dash switch then check the contacts are OK on this first as this can apparently cause issues.  When the system is operational one press on this pedal will make the wipers do one pass and park.
If looking at these contacts has not solved the issue move on>

Next open the bonnet and check the wiring is OK to the wiper motor. Check the earth strap to the bulkhead is making a good contact too.  
If the problem is still present it is more likely one of the contacts inside the motor is worn or broken.


Cortina Mk3 wiper motor location

You access the wiper motor and plugs by removing the black shroud.

I removed the wiper motor from the bulkhead to get a proper look at it by disconnecting the wiring and detaching the motor from the wiper assembly. It's just basic nuts and bolts really if a little fiddly at times - just take your time and remove anything necessary.  Of course it may not be necessary to remove the motor fully to inspect it so before forging ahead just see if it's possible to take the 'lid' off below without removing the whole motor. 

This is the bit you need to remove held on with two bolts
After removing the plastic lid that houses the connector for the multi-plug this is what you'll see: 

Cortina wiper motor faulty contact.
I've found the culprit!
Mine was missing a little bead (contact) on the bottom of one of the conductor strips so the park circuit was no longer working.
The silver disk forms part of the circuit which allows the wipers to continue a full sweep to their parked position, if both contacts are touching the disk at the appropriate place the wipers will park properly. 

The diagram above shows what the conductor strips should look like and what they look like with the missing contact, I guess they just wear out over time so no connection is made.

To repair the offending conductor strip needs to form contact with the disk again.  You could use a blob of solder but that could always come adrift, perhaps solder is harder than the copper used originally and would rub a groove into the disk?? I don't know.. so I opted to bend the conductor strip down gently so it was just making light contact with the disk.

I may in future open it up again and attach a blob of copper but it's been nearly a year since I did this and it still works, plus I have a spare motor.

Another point is that if your motor is working but not parking and you've found a motor which is not working but the contacts are fine inside then swap the contacts over.  These motors are simple and you can still fix them so think twice before chucking one in the bin!


Cortina Mk6 ART

Ok so this car doesn't exist or is even likely to but about 6 months ago there were a few sketches of a 'new' Cortina circulating around the motoring press, the designers took their influence from the Mk1 by the look of it.  Well, with the new Challenger, Mustang and Camaro I figured why shouldn't the new Cortina have a '70's vibe and be based on the Mk3 and quickly scribble this out. I tried to keep a ban the bomb style shape to the rear lenses though.
Copyright Richard Jones

Cortina Mk3 Interior bits and bobs


Not a great deal to report on, I have bunged a couple of simple bits on the car to make it more civilized. 


Dip mirror, it's a great feature to have in winter!
A rear view mirror with a dip feature so I don't keep getting dazzled.  The glass is a little tarnished around the edges (so was my original non dip version) but I quite like that the car is old enough for an authentic 'antique' mirror look.
Cortina MK3 Leather Steering Wheel

Leather rim steering wheel. In all honesty prefer the original as it's in a matching blue, but because this car is an "L" model the standard steering wheel is not covered in leather and the rim is quite skinny so I don't find it very comfortable to use.  I'll see if I can get the original wheel covered in matching blue leather at some point but for now I like this black one, it feels much nicer and is a bit more plush.  I do not know what model it's from, any ideas? late model 2000E? GT or XL? By the way it is on straight, the wheels are tuned! 


Carpet faded and wants re-dyeing, it should be navy blue.

The standard Cortina L interior is quite spartan really, no Radio or hazard warning light switch.  There is a little coin tray up front which I have removed for the time being.  At least this car has plush carpets, my last cortina, a base model, had a moulded rubber carpet like the one you find in the boot!  
You can see the pedal operation for the wash/wipe function near the clutch pedal.  They have a little pneumatic ball in them so when you pump your foot a few times it (un)enthusiastically squirts water over the windscreen while switching on the wipers.  What I might do is fit a small microswitch to operate an electric washer pump.
I saved the best thing 'till last. I have acquired a GT center console.  Seriously, it was like being a kid at Christmas again when this turned up, I was so pleased. I purchased it cheaply through a top bloke who's a member the club.    


Cortina Mk3 GXL GT center console arrangement.

I always wanted the GT or GXL center console in my last Cortina so I am really glad I have one for this car now, it feels like I am steadily making progress fulfilling achievements unrealized on the previous car. I also have two lots of gauge pods now, this console also came with gauges and I bought a pod on eBay last year with the intension of building my own console out of plywood (there are some good web pages with info on doing this).
You can still find the odd front section of center console but it's getting much harder to find the armrest section now, especially with the hinge and chrome check strap, luckily still attached to mine.
I need to give it a strip down, get some paint mixed up to match the blue of the interior and re-spray it.  The lid on the armrest has been made from wood at some point (surprisingly well really) as it's the correct profile so I'll just cover it with a thin layer of dense foam then finish with black vinyl.
Both sections of Cortina center console. 


Cortina Mk3 GT GXL center console

That is how I think I'll paint it.  

I need some original Cortina Mk3 seatbelt buckles, the ones fitted are not the right ones, you might notice the ones on there are really way too short meaning you cant actually get the buckle past the seat and the console to click it in so I need to add those to my shopping list at some point.         

Thursday, May 2, 2013

It's nearly the end of the week so here's the next artwork installment, no news to report on the (actual) car just yet, I've purchased a few goodies but will have to photograph everything properly and update at some point..
Gulf Racer